OTA updates for .NET Applications
Let us see how we can build a .NET core console application that can upgrade itself using the Cincinnati update protocol. The Cincinnati protocol will serve OTA updates to the client. Cincinnati is an update protocol designed by Openshift as a successor to Google’s Omaha update protocol. It describes a method for representing transitions between releases and allowing a client to perform automatic updates between these releases.
Diagrammatically the solution is
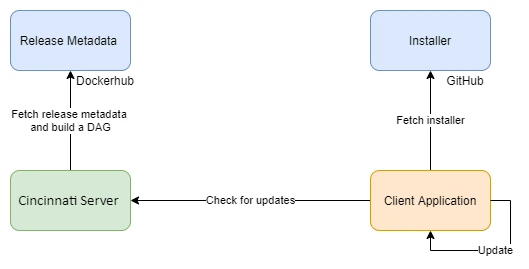
The client application checks for updates by reaching out to a central update server (Cincinnati Server shown in green above). Cincinnati pulls the metadata stored in a docker registry, builds, and returns a DAG (directed acyclic graph) repesenting the upgrade paths along with metadata. The client application (shown in orange) uses this graph to determine if an upgrade is available. Using the upgrade metadata, the client downloads and launches the installer to start the upgrade process.
What constitutes a release?
A release consists of two parts:
- Installer - The installer should be able to upgrade the application with minimal user input.
- Release metadata - Release metadata is a JSON document that contains:
- Channel of the release, i.e., stable, beta, alpha, fast ring etc
- Platform
- Weblink to the installer
- The version of the installer
- Upgrade paths
- Any other metadata needed for the upgrade process such as “have the T&C changed requiring the user consent”, “type of release” and so on
An example release metadata for version 1.1.0 of an application will be:
{
	"kind": "cincinnati-metadata-v0",
	"version": "1.1.0",
	"previous": ["1.0.0"],
	"metadata": {
    "graph.release.channels": "stable",
    "graph.release.arch": "amd64",
		"kind": "release"
	}
}
The “previous” field in the JSON document will determine the versions of the applications that can upgrade to version 1.1.0. The upgrade paths can be controlled using the previous field or the next field as explained here.
“graph.release.channels” is used to indicate the channel (alpha, beta, stable etc) for this release. “graph.release.arch” is used to indicate the architecture for this release, i.e., amd64, arm, x86 etc. Cincinnati uses these two fields to filter the graph, i.e., a client in the stable channel with amd64 architecture will not receive the upgrade paths for other channels and architectures. You can add more metadata inside the “metadata” object.
For the sake of simplicity, we will be making use of a single channel. Let us now look at the various components and how we can build/deploy each.
Part 1 – Cincinnati Server
You can find the source code for the Cincinnati server here and the docker image here. This fork of Cincinnati removes OpenShift specific code.
To run the Cincinnati server, we need a docker repository to store the release metadata. Create a blank repository in the docker registry of your choice and then open a terminal and run the following command to start the Cincinnati server on port 9000.
docker run -p 9000:9000 -d -e PORT=9000 -e REGISTRY=<<registory-url>> -e REPOSITORY=<<username>>/<<repository-name>> lalitadithya/Cincinnati
Part 2 – The .NET Core Application
The application should upgrade itself after the user has closed the application, similar to Slack and Visual Studio Code. In .NET, we can register an event handler for AppDomain.CurrentDomain.ProcessExit event, and then we can use the Process library to start the installer as shown in the snippet below:
static bool isUpdateAvailable = false;

static void Main(string[] args)
{
    AppDomain.CurrentDomain.ProcessExit += CurrentDomain_ProcessExit;
    // process user request and check for updates in the background and download it if it is available
    isUpdateAvailable = true;
}

private static void CurrentDomain_ProcessExit(object sender, EventArgs e)
{
    if(isUpdateAvailable)
    {
        Process.Start(new ProcessStartInfo(installerLocation)
        {
            UseShellExecute = true
        });
    }
}
To interact with the Cincinnati server, we can make use of a NuGet package called “cincinnati-client-net” (GitHub and nuget). This library queries Cincinnati for upgrade paths, and it returns a list of the possible upgrades along with the metadata as a dictionary. The metadata is fetched from the release metadata that we will create in the next step.
static string updateServer = "localhost:9000";

static void Main(string[] args)
{
    Version version = Assembly.GetExecutingAssembly().GetName().Version;
    string currentVersion = $"{version.Major}.{version.Minor}.{version.Revision}";

    // check for updates
    CincinnatiClient cincinnatiClient = CincinnatiClientBuilder.GetBuilder()
                                            .WithServerUrl(updateServer)
                                            .WithReleaseChannel("stable")
                                            .Build(new HttpClient());
    var availableUpgrades = cincinnatiClient.GetNextApplicationVersions(currentVersion).GetAwaiter().GetResult();
    if(availableUpgrades.Count == 1)
    {
        string newVersion = availableUpgrades[0].Version;
        string installerWebLocation = availableUpgrades[0].Metadata["installer"];
        Console.WriteLine("Downloading update for version " + newVersion);
        installerLocation = Path.Join(Path.GetTempPath(), $"AutoUpdateSample.{newVersion}.msi");
        using var client = new WebClient();
        client.DownloadFile(installerWebLocation, installerLocation);
    }
}
This snippet uses the library to fetch the possible upgrades and then downloads the installer for the upgrade. The download location for the installer is fetched from the metadata.
I have created two versions of a sample application. You can find the source code and the installers below:
- Version 1.0.0
- Source: GitHub
- Installer: GitHub Releases
- Version 1.1.0
- Source: GitHub
- Installer: GitHub Releases
Part 3 – The Release Metadata
Now that we have two versions of the application (along with an installer) and the Cincinnati server running locally, we can create the release metadata and push it to the docker repository that we created in part 1.
Create a JSON file called “1.0.0.json” with the following contents. This is the release metadata for version 1.0.0. Notice that the download link for the installer is present in the “metadata” object. This value is used by the application to download the installer
{
  "kind": "cincinnati-metadata-v0",
  "version": "1.0.0",
  "previous": [],
  "metadata": {
    "graph.release.channels": "stable",
    "installer": "https://github.com/lalitadithya/auto-update-sample/releases/download/1.0.0/AutoUpdateSample.1.0.0.msi"
  }
}
Package this release metadata file into a docker container using the docker file shown below:
FROM scratch
COPY 1.0.0.json release-manifests/release-metadata
Build and push the release metadata using the following commands:
docker build -t <<username>>/<<repository-name>>:1.0.0 .
docker push <<username>>/<<repository-name>>:1.0.0
Repeat this process for version 1.1.0. Make sure to use tag 1.1.0 while building the docker container and not tag 1.0.0. The metadata for version 1.1.0 will be
{
  "kind": "cincinnati-metadata-v0",
  "version": "1.1.0",
  "previous": [ "1.0.0" ],
  "metadata": {
    "graph.release.channels": "stable",
    "installer": "https://github.com/lalitadithya/auto-update-sample/releases/download/1.1.0/AutoUpdateSample.1.1.0.msi"
  }
}
Part 4 – Final Result
Restart the Cincinnati server. Install and run version 1.0.0 of the application using the installer, and you should see the application auto-upgrade to 1.1.0.