How to Save Money by “Turning Off” your Azure PaaS Resources
Azure resources can be broadly divided into the following categories:
- Platform as a Services (PaaS)
- Consumption based – e.g., Azure Functions, Azure Logic Apps, Azure Container Instances etc
- Hour based – e.g., Azure SQL Server, Azure Database for Postgres, Azure Kubernetes Service etc
- Infrastructure as a Service (IaaS) – e.g., Azure Virtual Machines
- Software as a Service (SaaS) – e.g., Microsoft 365
In an ideal world, all our workloads will be entirely consumption based and we only pay for what we use. Often that is not the case our workloads consist of a mix of consumption-based PaaS, hour-based PaaS and sometimes sprinkled with IaaS for good measure. One of the major downsides of the hour-based PaaS is that they do not have a “stop” or a “start” button like IaaS resources generally do. In this post we are going to be looking at how we can save more than just a few bucks on our Azure bill by turning off the hour-based PaaS services when we are not using them.
A lot of folks save on their Azure bill by opting for the 1-year reserved or the 3-year reserved option for production use, but that kind of commitment might not be needed for dev/test or side projects. In most cases the only option we have would be to delete the resources after we are done with them and then re-create them when we need them. That is a viable approach, but we lose the “state” of our resources. “State” of a resource means many things. It can be the tables and/or stored procedures in case of a database, or it could be deployments in case of Kubernetes.
We can export the state before deleting the resource and then delete the resource. When we want to start the resource back up, we can create the resource and import the state back. This is exactly what I used to do.
This got me thinking: the delete/create is an extremely redundant and boring process that I do at least twice a week. Can this be automated? Afterall a wise man once said
If you must do something more than twice, stop and automate it
– A wise man
Ferb, I know what we’re gonna do today
We are going to be building two docker containers that will give us the ability to “turn off” PaaS resources when we are not using them.
We will be making use Azure Container Instances to run these containers and we will use Azure Logic Apps to trigger the docker containers. We will also be making use of a storage media such as Azure Storage to store state and finally we will leverage Azure’s ARM templates to create our PaaS resources on demand.
Side note
I am taking Azure SQL server as an example for this post, but the method described here is extremely generic and it can be used for any PaaS resource on Azure. I also make use of Azure storage and Azure container registry for storing state as I have those running 24*7, but you can make use of any other storage media like Google Drive or OneDrive and you can make use of Docker Hub for storing your container images if you don’t want to use Azure container registry.
Azure Container Instances
First, let us talk about Azure’s container instances (ACI). ACI lets you build container-based event driven applications. If you want a short-lived container to run in response to (sporadic) events you can do that with ACI. The icing on the cake is that you will only be billed for the time your container is running. Pretty cool, right?
Wait, why do we need ACI? I can do almost anything with Azure Functions and/or Azure Logic Apps, right?
Yes and no.
If you just want to destroy/create resources you can probably do that using the Azure management SDK and Azure functions, but if you want to make use of other tools like sqlcmd, kubectl etc for saving/restoring your resource’s state you most likely can not use Azure Functions or Azure Logic Apps.
Let us drive right into it, shall we?
Let us start by dividing our resources into three separate resources groups, namely:
- rg-acme-rebootable – This resource group will contain the PaaS resources that we would like to “start” and “stop”
- rg-acme-non-rebootable – This resource group will contain all our other resources that we need to keep running for our application and are consumption based
- rg-acme-automation – This resource group will contain all the resources that we will be using for automation
If we have an Azure Functions app that connects to an Azure SQL backend. We should put the functions app in the “rg-acme-non-rebootable” and the SQL server in the “rg-acme-rebootable” resource group.
To “start” and “stop” the SQL server we are going to be making use of PowerShell scripts which will be run inside docker containers on ACI.
Let us now look at the scripts.
“Stop”ing the SQL database
To stop the database, we can make use of a super cool tool called mssql-scripter. For those of you who are familiar with SQL server you know that SSMS provides an option called “generate scripts” which can be used to export schema and data to an SQL file. mssql-scripter is the command line version of that option.
A snippet from the script is shown below. You can find the complete script here.
Write-Host "Attempting Azure login"
az login --identity
Write-Host "Database export started"
mssql-scripter -S $DatabaseServerName -d $DatabaseName -U $AdminUsername -P $AdminPassword --schema-and-data --target-server-version "AzureDB" --display-progress > backup.sql
Write-Host "Uploading script to blob"
az storage blob upload -f backup.sql -c $StorageContainerName -n backup.sql --connection-string "$StorageConnectionString"
Write-Host "Stopping database in resource group $ResourceGroupName"
az group delete -n $ResourceGroupName --yes
Write-Host "Database stopped"
The script first logs in to Azure using the “az login” command. It then makes use of the mssql-scripter tool to export the database to an SQL file. After the export is complete, it uploads the file to Azure storage and then it deletes the resource group. You can customize the upload target to any other cloud storage by making use of a utility like rclone.
As mentioned earlier, the script will be running inside a docker container. The DockerFile for the container is shown below:
FROM ubuntu:18.04
# install azure cli
RUN apt-get update  \
    apt-get install -y ca-certificates curl apt-transport-https lsb-release gnupg  \
    curl -sL https://packages.microsoft.com/keys/microsoft.asc | gpg --dearmor | tee /etc/apt/trusted.gpg.d/microsoft.asc.gpg > /dev/null  \
    AZ_REPO=$(lsb_release -cs)  \
    echo "deb [arch=amd64] https://packages.microsoft.com/repos/azure-cli/ $AZ_REPO main" | tee /etc/apt/sources.list.d/azure-cli.list  \
    apt-get update  \
    apt-get install -y azure-cli
# install pwsh
RUN apt-get -y install wget software-properties-common  \
    wget -q https://packages.microsoft.com/config/ubuntu/18.04/packages-microsoft-prod.deb  \
    dpkg -i packages-microsoft-prod.deb  \
    apt-get update  \
    add-apt-repository universe  \
    apt-get install -y powershell
# install mssql-scripter
RUN apt-get -y install python python-pip  \
    pip install mssql-scripter
COPY stop-database.ps1 /stop-database.ps1
CMD ["pwsh" ,".\\stop-database.ps1", \
    "-ResourceGroupName", "", \
    "-DatabaseServerName", "", \
    "-DatabaseName", "", \
    "-AdminPassword", "", \
    "-AdminUsername", "", \
    "-StorageConnectionString", "\"<<connection string goes here>>\"", \
    "-StorageContainerName", ""]
In the DockerFile, we first install Azure CLI, PowerShell and mssql-scripter. The script shown above is copied into the container and the script is executed using the “CMD” command. This container will run the script and then it will terminate.
You can find the DockerFile here.
“Start”ing the database
To start the database, we make use of Azure’s ARM template deployment model to deploy SQL server and then we can make use of Microsoft’s sqlcmd to run the exported SQL file after downloading it from the storage media.
A snippet from the script is shown below. You can find the complete version of the script here.
Write-Host "Attempting Azure login"
az login --identity
Write-Host "Fetching ARM template"
az storage blob download -c $TemplateStorageContainerName --file template.json --name template.json  --connection-string "$StorageConnectionString"
Write-Host "Fetching template parameters"
az storage blob download -c $TemplateStorageContainerName --file parameters.json --name parameters.json  --connection-string "$StorageConnectionString"
Write-Host "Creating resource group"
az group create --name $ResourceGroupName --location eastus
Write-Host "Database create started"
$deploymentName = Get-Date -Format "MMddyyyyHHmmss"
az group deployment create --name $deploymentName --resource-group $ResourceGroupName --template-file template.json --parameters `@parameters.json
Write-Host "Database restore started"
az storage blob download -c $DatabaseStorageContainerName --file backup.sql --name backup.sql  --connection-string "$StorageConnectionString"
$content = (Get-Content '.\backup.sql')
$content[105..($content.Length-3)] | Set-Content backup.sql
/opt/mssql-tools/bin/sqlcmd -U $AdminUsername -S $DatabaseServerName -P $AdminPassword -i "./backup.sql" -d $DatabaseName
Write-Host "Deleting backup"
az storage blob delete -c $DatabaseStorageContainerName --name backup.sql --connection-string "$StorageConnectionString"
The script logs in to Azure using the “az login” command. It creates a resource group for the resources and deploys the SQL server from an ARM template. After the deployment is complete, the script fetches the SQL export from the storage media and makes use of the sqlcmd command to run the script. Once done, the script deletes the SQL file from the storage media. As mentioned previously, you can make use of any cloud storage media of your choice you do not have to stick to Azure Storage.
This script will also be run in a Docker container like the previous one. The DockerFile for this one is extremely similar to the previous script and it can be found here.
Now that we know the scripts that will be used to “start” and “stop” the SQL server, let us now look at how we can put all of this together.
Putting it all together
Push the two docker images to a container registry of your choice and create a two ACI instances from the Azure portal as shown in the screenshots below. Make sure to clear out the “Command Override” text box in the advanced tab and set the “Restart Policy” to never.
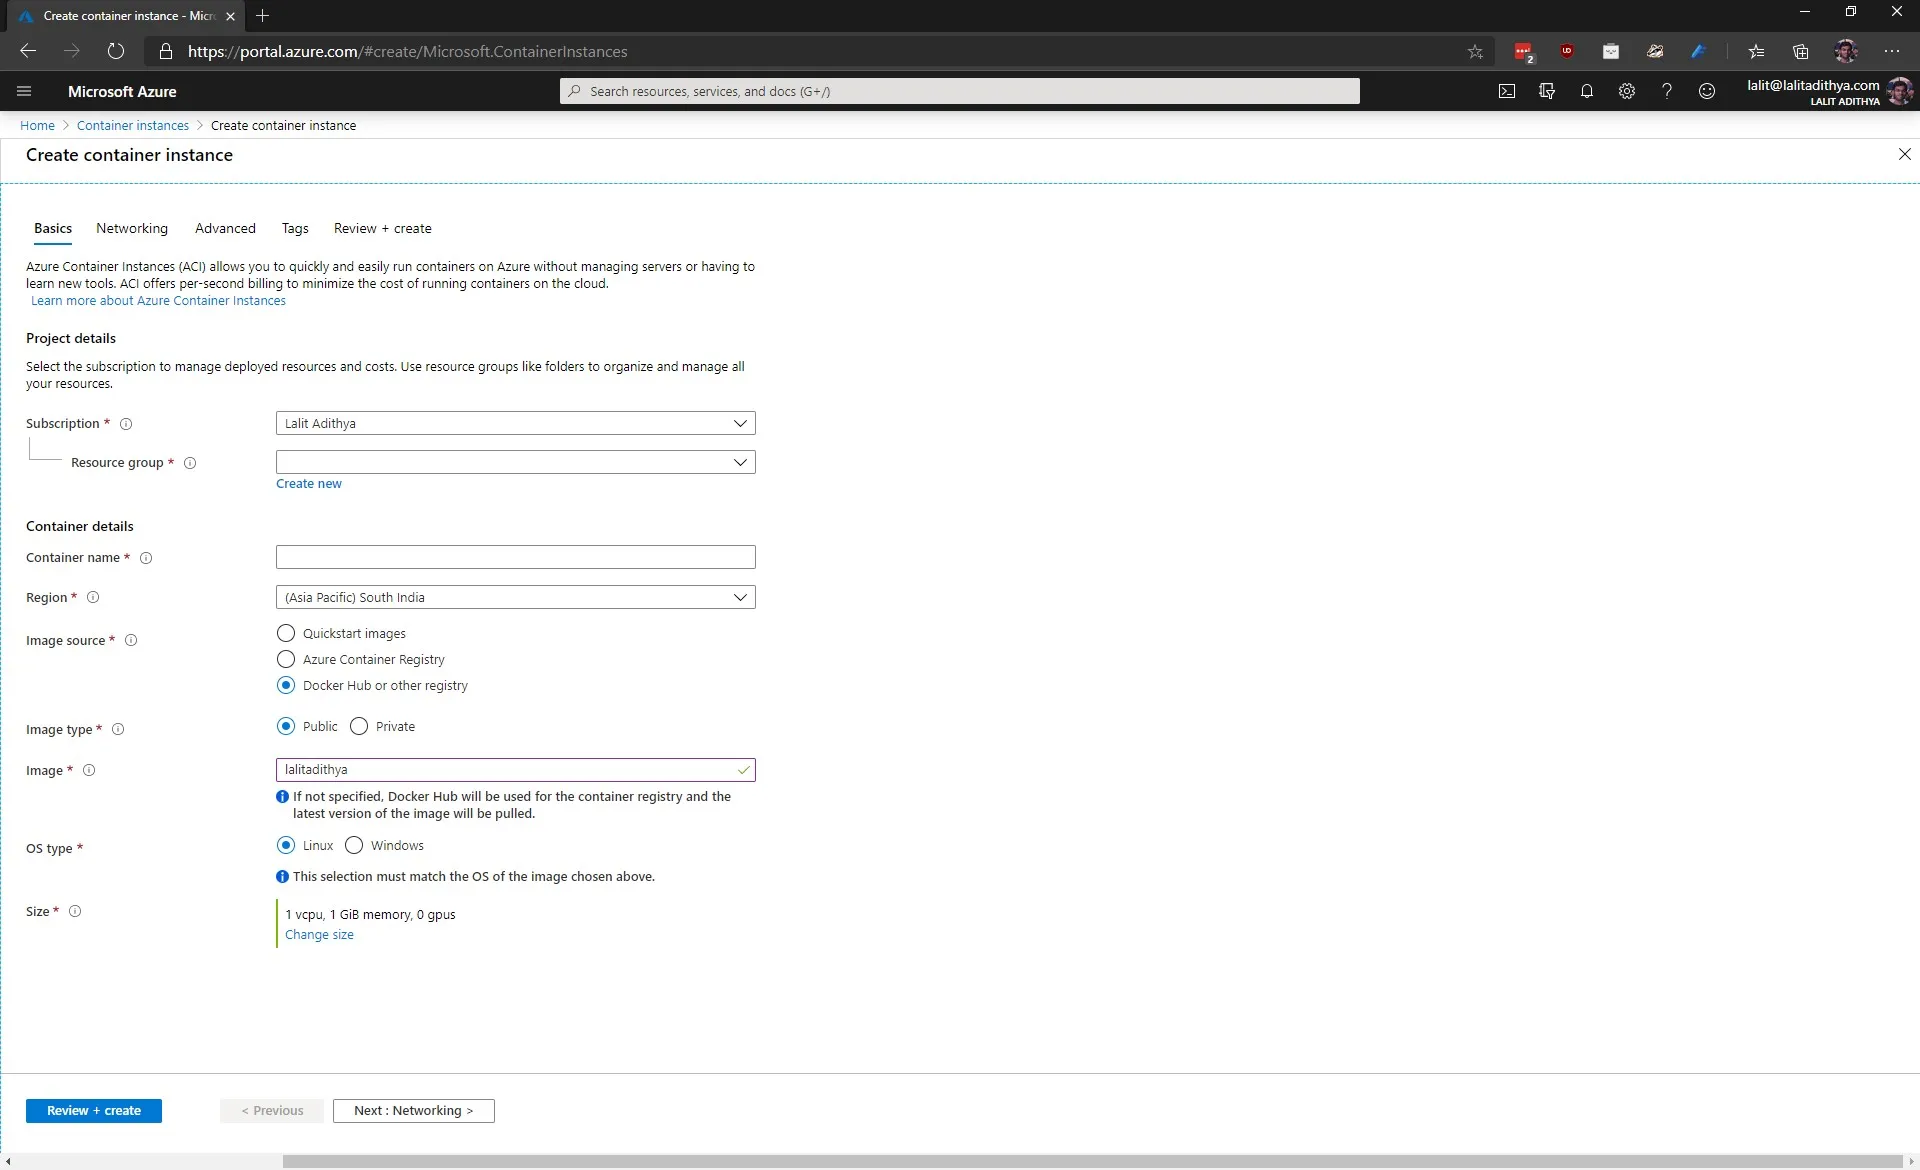
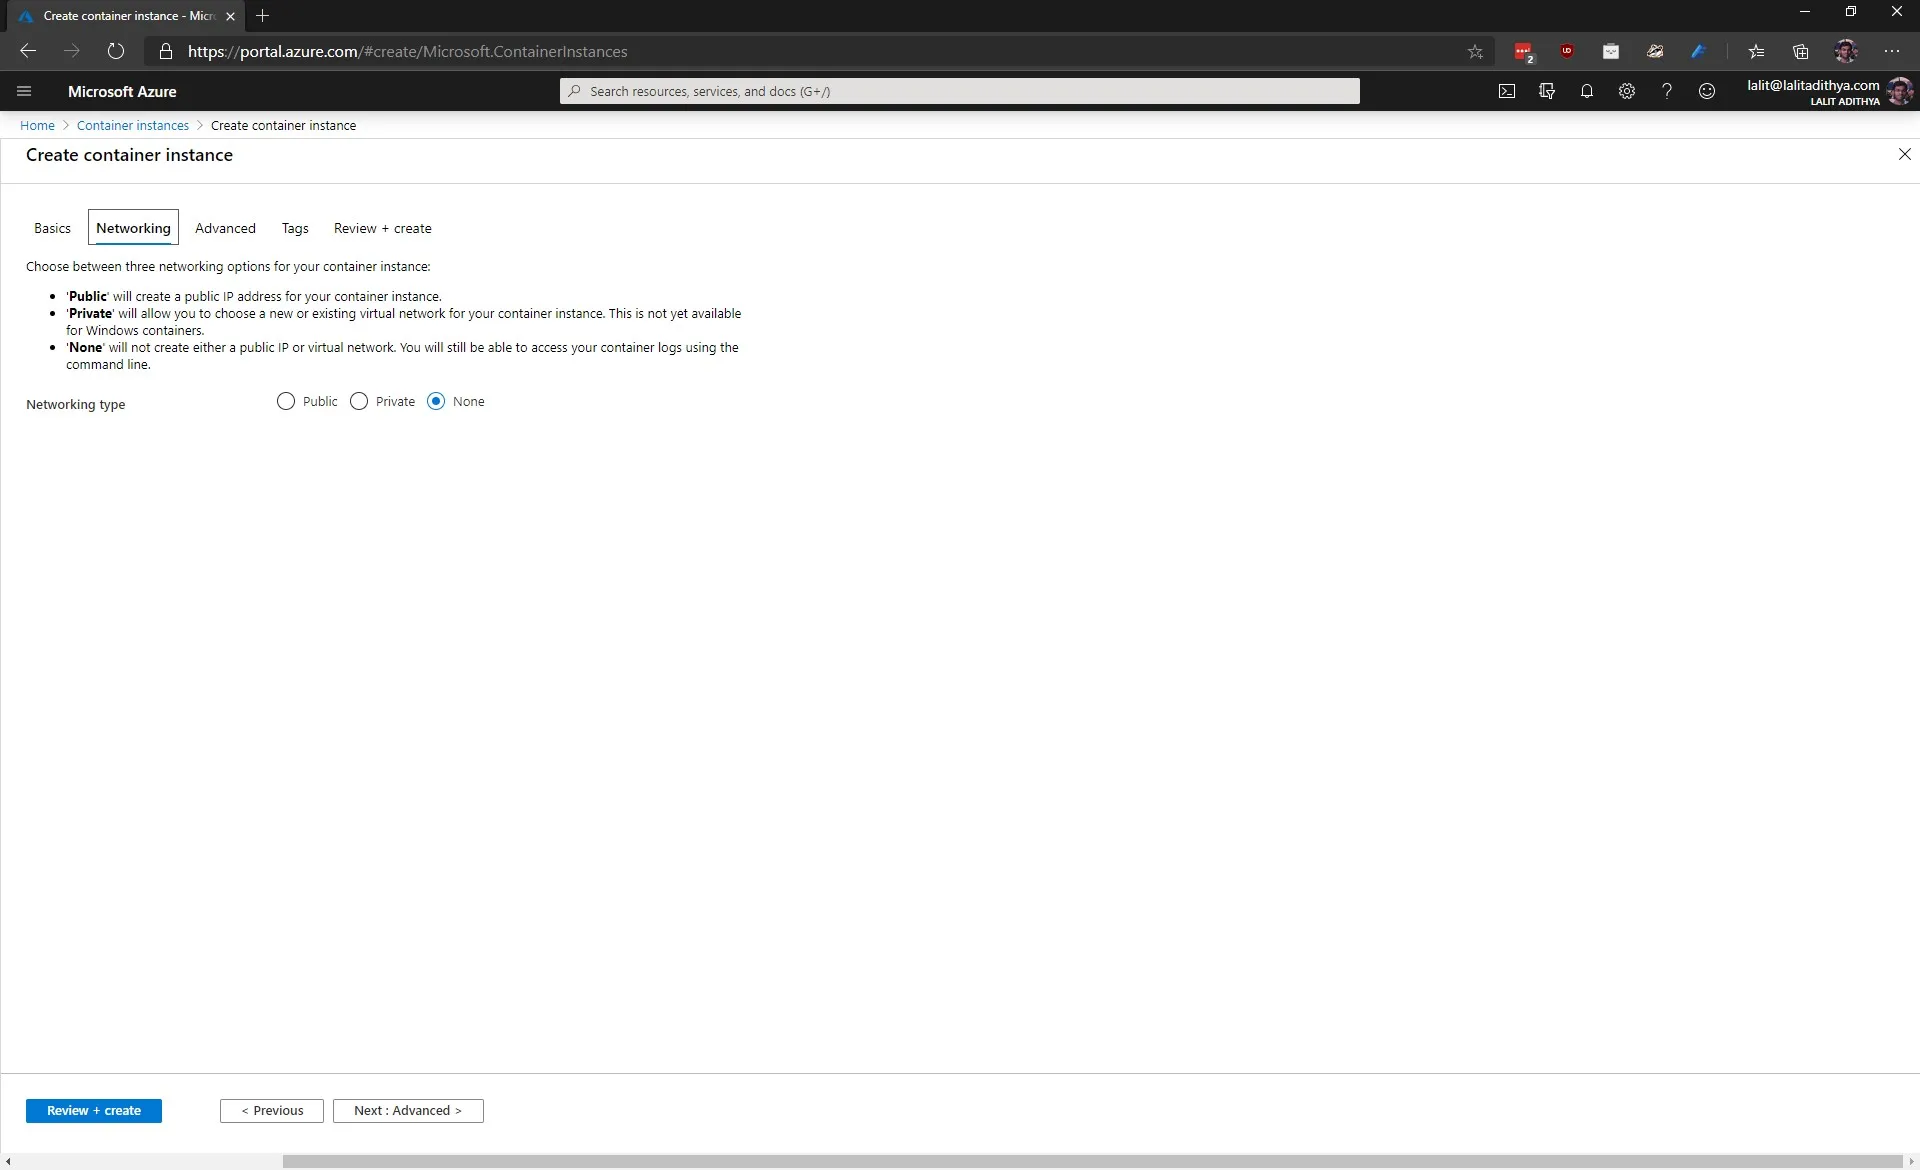
After the ACI instances have been provisioned, assign a system managed identity, and provide it with enough access to create/destroy your PaaS resources. Restart your ACI containers and verify that the RBAC is working as expected.
We now have two containers running on ACI which can “start” and “stop” our PaaS resources (in my case an SQL server). All we need to do now is to figure out how to trigger the ACI instances.
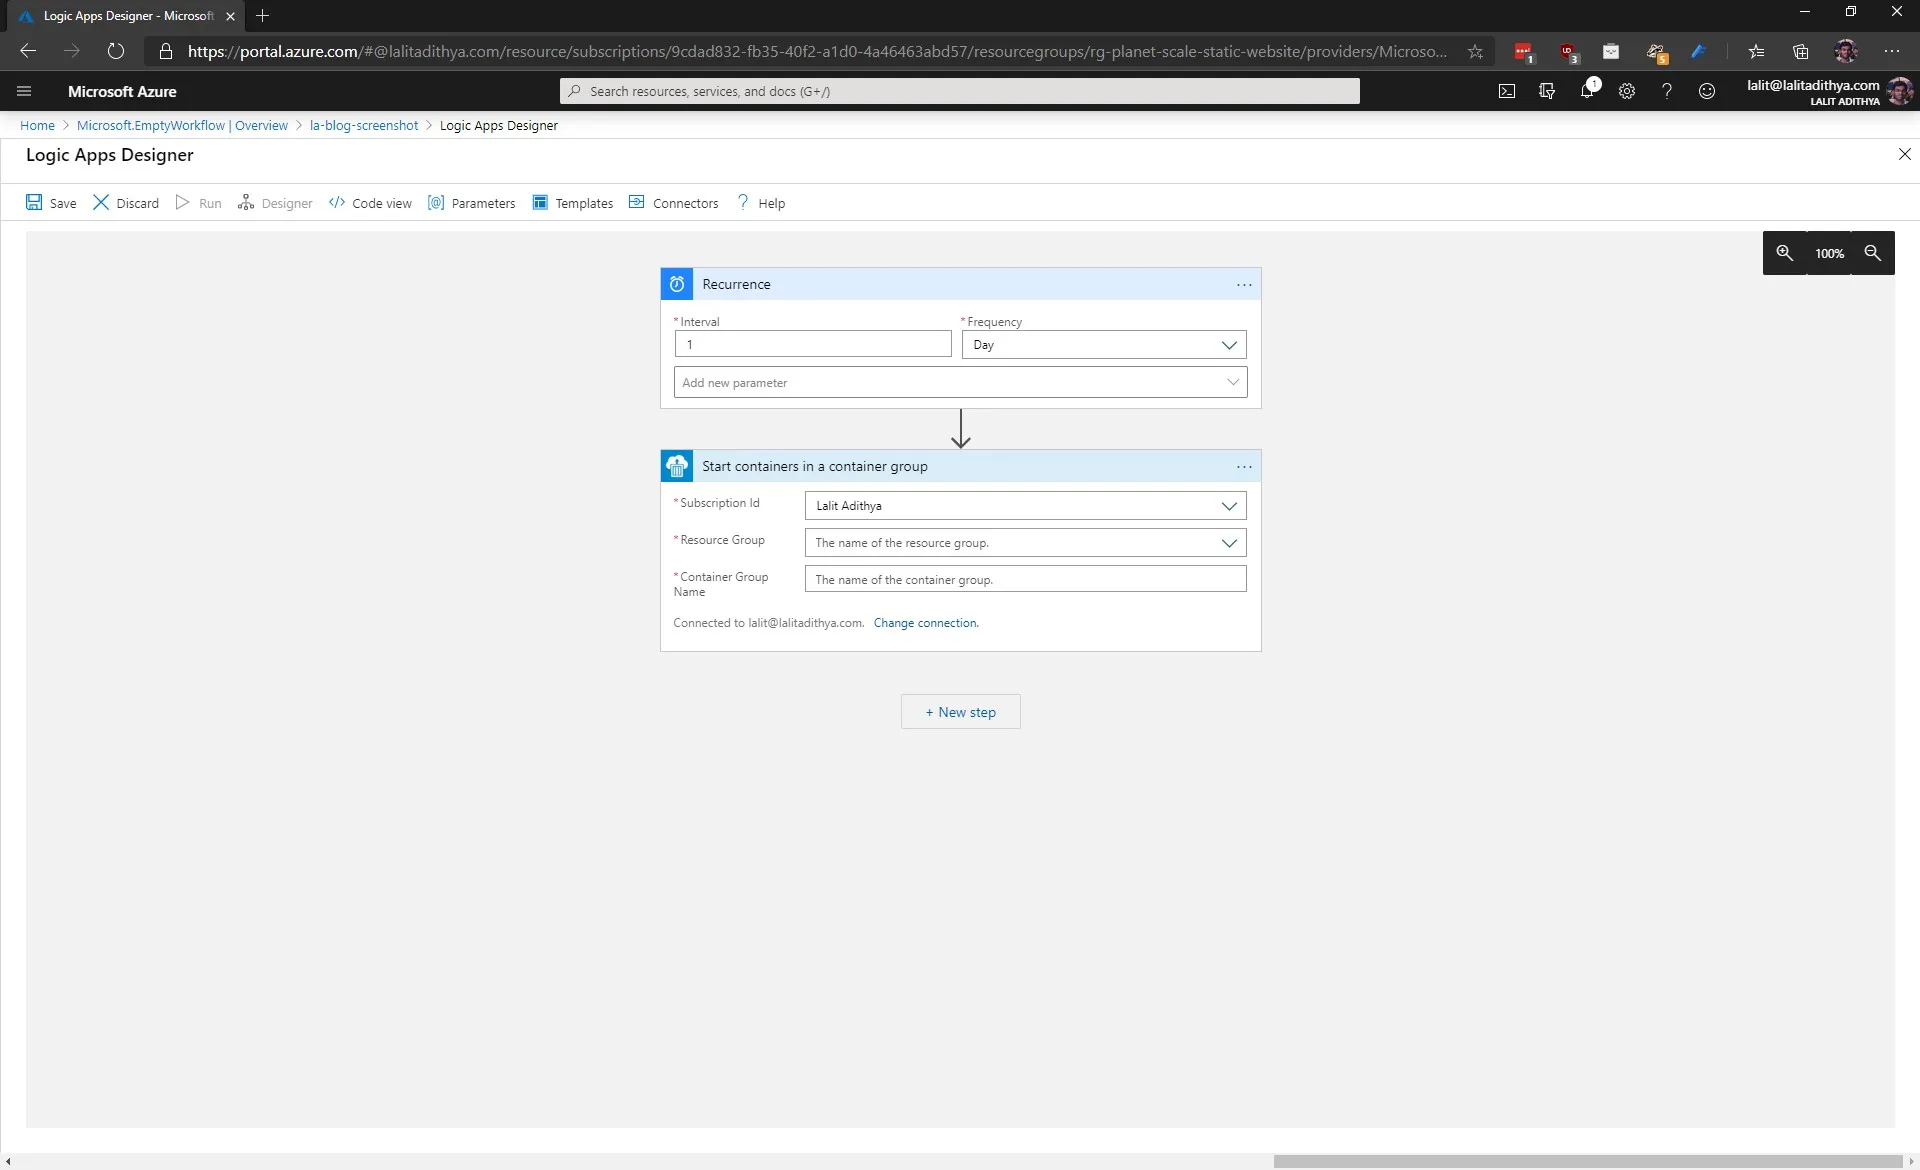
Enter, Azure Logic Apps
Azure Logic Apps will be perfect for our trigger due to the large number of connectors and triggers that it supports. Go ahead and create two new Azure Logic Apps and configure the trigger of your choice (in my case I have chosen the recurrence trigger) and add a step to start the container instance as shown in the screenshot below:
Conclusion
In this post we had a look at how we can “turn off” Azure PaaS resources which do not have a Microsoft provided start/stop button. To achieve this, we made use of Azure Container Register (ACI) to run the Docker containers which run PowerShell scripts to save/restore the “state” of the PaaS resource and then delete/create resource. For triggering the ACI, we made use of Azure Logic Apps due to the large number of connectors and triggers that it supports.