Head First: HTTP Routing in Kubernetes using Istio
In this blog post, we are going to look at how to use path-based HTTP routing in Kubernetes using a service mesh called Istio. I am going to be using Azure for this blog, but you should be able to customize the steps for any cloud provider easily.
What is a service mesh?
A service mesh ensures that communication among containerized and often ephemeral application infrastructure services is fast, reliable, and secure. The mesh provides critical capabilities including service discovery, load balancing, encryption, observability, traceability, authentication and authorization, and support for the circuit breaker pattern. [1]
What is Istio?
Istio, backed by Google, IBM, and Lyft, is currently the best‑known service mesh architecture. Kubernetes, which was originally designed by Google, is currently the only container orchestration framework supported by Istio. [1]
Let us dive in head first!
The Acme Corp (GitHub) is a multi-national service aggregation company that has offices across the globe. They would like to convert their existing monolithic application to microservices.
The architects have identified two microservices that they would like to start with, namely, the books aggregation microservice and the vinyl album aggregation microservice. The high-level architecture diagram for what we are going to be building is shown below:
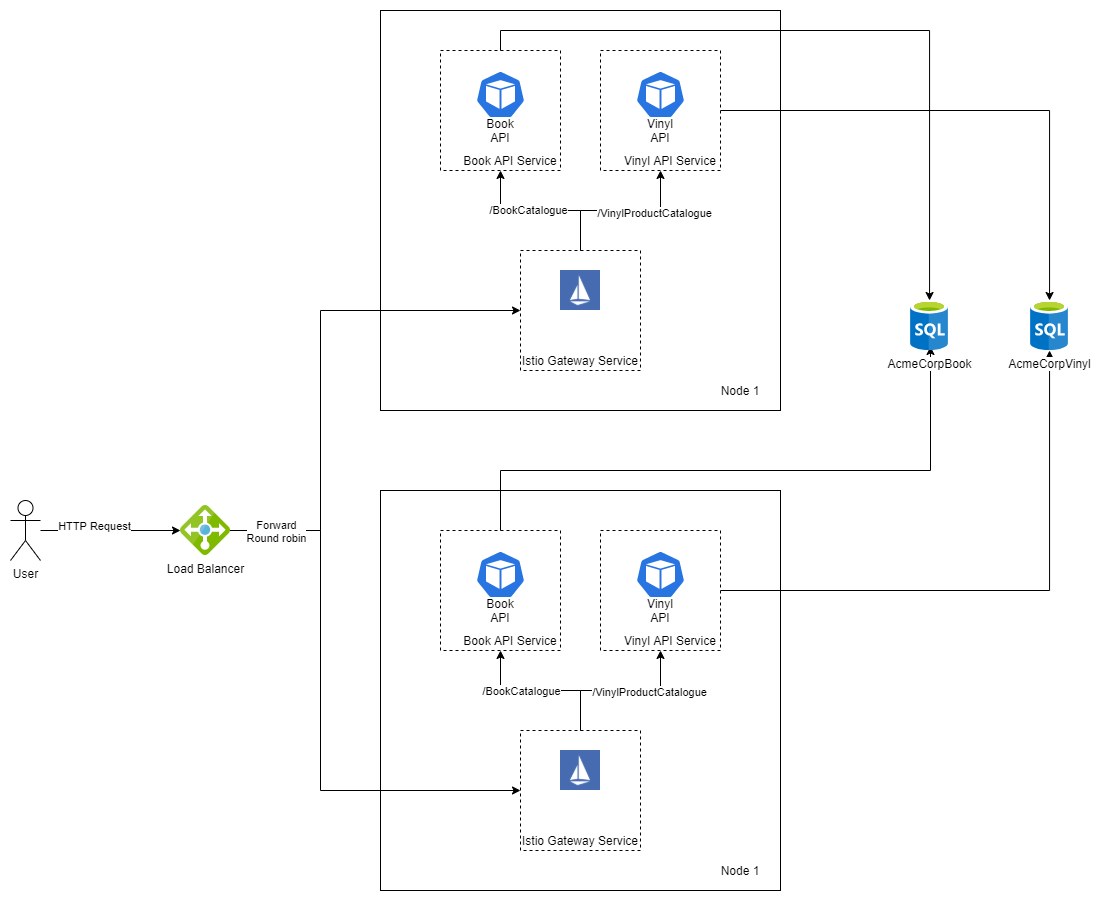
The developers have converted the monolithic application into two containerized application and they have pushed the images to docker hub (Vinyl Microservice and Book Microservice).
The book microservice will respond to HTTP requests that have the URL prefix “/BookCatalogue” and the vinyl microservice will respond to the “/VinylProductCatalogue” URL prefix.
Let us start by creating:
- 2 SQL databases. One for the vinyl microservice and other for the book microservice
- 1 AKS cluster (You will need at least 2 vCPU and 7 GB of RAM)
- Make sure that the AKS cluster can access the databases that you created above
Once all the resources have been successfully provisioned, let us start installing Istio
Installing Istio
Fire up the Azure Cloud Shell and fetch credentials for Kubernetes cluster by running the following command
az aks get-credentials --resource-group <<name of your resource group>>
                       --name <<name of your aks cluster>>
Now, create a namespace for Istio by running the following command
kubectl create namespace istio-system --save-config
In order to install Istio, we will be using the YAML file shown below:
apiVersion: install.istio.io/v1alpha2
kind: IstioControlPlane
spec:
  profile: default
  values:
    global:
      defaultNodeSelector:
        beta.kubernetes.io/os: linux
      controlPlaneSecurityEnabled: true
      mtls:
        enabled: false
Line 4: This will install Istio in the default profile. In the default profile we will get: an ingress gateway (used to route traffic), Istio pilot (used for traffic management) and Prometheus Line 8: This will ensure that Istio pods will only run on Linux nodes. Line 9: We enable mutual TLS for the control plane. Line 11: We disable mutual TLS for all services in the data plane
Create this file in the could shell and call it “istio.aks.yaml” and then install Istio by running the following command:
istioctl manifest apply -f istio.aks.yaml –logtostderr
After the install is complete, you should be seeing the following output

In order to use Istio, we need to enable Istio injection for the namespace that we plan to use. For this demo, we are going to be using the default namespace, so, let us enable Istio injection by running the following command:
kubectl label namespace default istio-injection=enabled
Deploy the Vinyl Microservice
In this section we will be deploying the vinyl microservice using the YAML file below:
apiVersion: apps/v1
kind: Deployment
metadata:
  name: vinyl-deployment
  labels:
    app: vinyl-api
spec:
  replicas: 1
  selector:
    matchLabels:
      app: vinyl-api
  template:
    metadata:
      labels:
        app: vinyl-api
    spec:
      containers:
      - name: vinyl-api
        image: lalitadithya/acmecorpvinylproductcalalogueapi:latest
        ports:
        - containerPort: 80
        env:
        - name: ConnectionString
          value: "<<Insert your connection string here>>"
---
apiVersion: v1
kind: Service
metadata:
  name: vinyl-api-service
  labels:
    app: vinyl-api
spec:
  ports:
  - name: vinyl-api-inbound
    port: 8000
    targetPort: 80
  selector:
    app: vinyl-api
This YAML file tells Kubernetes to create a service called “vinyl-api-service” that will be listening on port 8000. The image for this service will be pulled from docker hub. Be sure to update the connection string in the YAML file.
Create the above YAML file in the cloud shell and call it “deploy-vinyl.yaml” and deploy the microservice by running the following command:
kubectl apply -f ./deploy-vinyl.yaml
Deploy the book microservice
In this section we will be deploying the book microservice using the YAML file below:
apiVersion: apps/v1
kind: Deployment
metadata:
  name: book-deployment
  labels:
    app: book-api
spec:
  replicas: 1
  selector:
    matchLabels:
      app: book-api
  template:
    metadata:
      labels:
        app: book-api
    spec:
      containers:
      - name: book-api
        image: lalitadithya/acmecorpbookcatalogueapi:latest
        ports:
        - containerPort: 80
        env:
        - name: ConnectionString
          value: "<<Insert your connection string here>>"
---
apiVersion: v1
kind: Service
metadata:
  name: book-api-service
  labels:
    app: book-api
spec:
  ports:
  - name: book-api-inbound
    port: 9000
    targetPort: 80
  selector:
    app: book-api
This YAML file tells Kubernetes to create a service called “vinyl-book-service” that will be listening on port 9000. The image for this service will be pulled from docker hub. Be sure to update the connection string in the YAML file.
Create the above YAML file in the cloud shell and call it “deploy-book.yaml” and deploy the microservice by running the following command:
kubectl apply -f ./deploy-book.yaml
Apply the routing rules
For applying the routing rules, we are going to the use the following YAML:
apiVersion: networking.istio.io/v1alpha3
kind: Gateway
metadata:
  name: public-gateway
spec:
  selector:
    istio: ingressgateway
  servers:
  - port:
      number: 80
      name: http
      protocol: HTTP
    hosts:
    - "*"
---
apiVersion: networking.istio.io/v1alpha3
kind: VirtualService
metadata:
  name: book-api-vservice
spec:
  hosts:
  - "*"
  gateways:
  - public-gateway
  http:
  - match:
    - uri:
        prefix: /BookCatalogue
    route:
    - destination:
        port:
          number: 9000
        host: book-api-service
---
apiVersion: networking.istio.io/v1alpha3
kind: VirtualService
metadata:
  name: vinyl-api-vservice
spec:
  hosts:
  - "*"
  gateways:
  - public-gateway
  http:
  - match:
    - uri:
        prefix: /VinylProductCatalogue
    route:
    - destination:
        port:
          number: 8000
        host: vinyl-api-service
Line 1 to 14: These lines create a default Istio gateway called “public-gateway” that will be listening for HTTP connections on port 80 from any host. Line 16 to 33: Here we create a virtual service for the “books” API service. A Virtual Service defines a set of traffic routing rules to apply when a host is addressed. Each routing rule defines matching criteria for traffic of a specific protocol. If the traffic is matched, then it is sent to a named destination service (or subset/version of it) defined in the registry. In this case, we are telling the Istio gateway to route any HTTP traffic that start with “/BookCatalogue” to the “book-api-service” service on port 9000. Line 35 to 52: Here we create a virtual service for the “vinyl” API service. A Virtual Service defines a set of traffic routing rules to apply when a host is addressed. Each routing rule defines matching criteria for traffic of a specific protocol. If the traffic is matched, then it is sent to a named destination service (or subset/version of it) defined in the registry. In this case, we are telling the Istio gateway to route any HTTP traffic that start with “/VinylProductCatalogue” to the “vinyl-api-service” service on port 8000.
Deploy the gateway along with the routing rules by running the following command:
kubectl apply -f ./istio-gateway.yaml
The results
Find out the public IP of your AKS cluster by running the following command:
kubectl get svc istio-ingressgateway -n istio-system
Note down the IP address in the column “EXTERNAL-IP” and use Postman to make HTTP GET requests to the following end points:
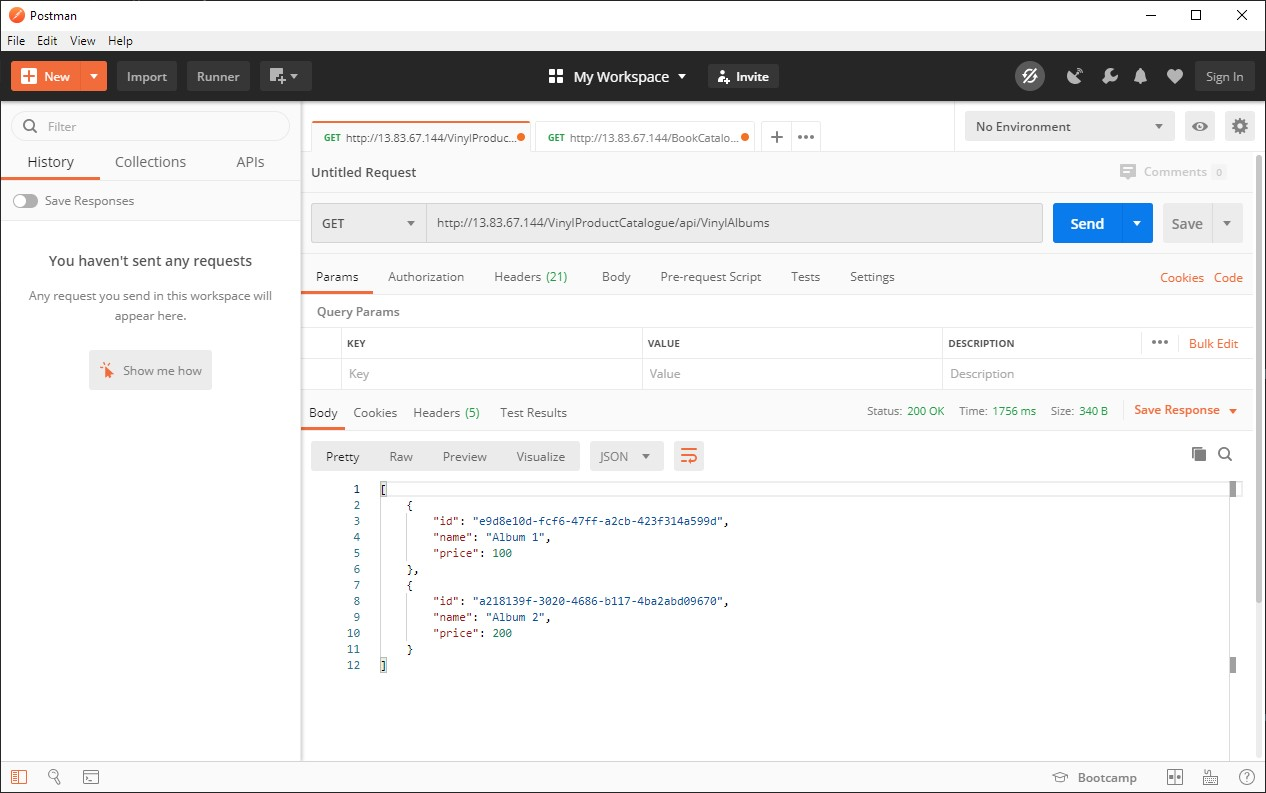
- http://IP Address/VinylProductCatalogue/api/VinylAlbums
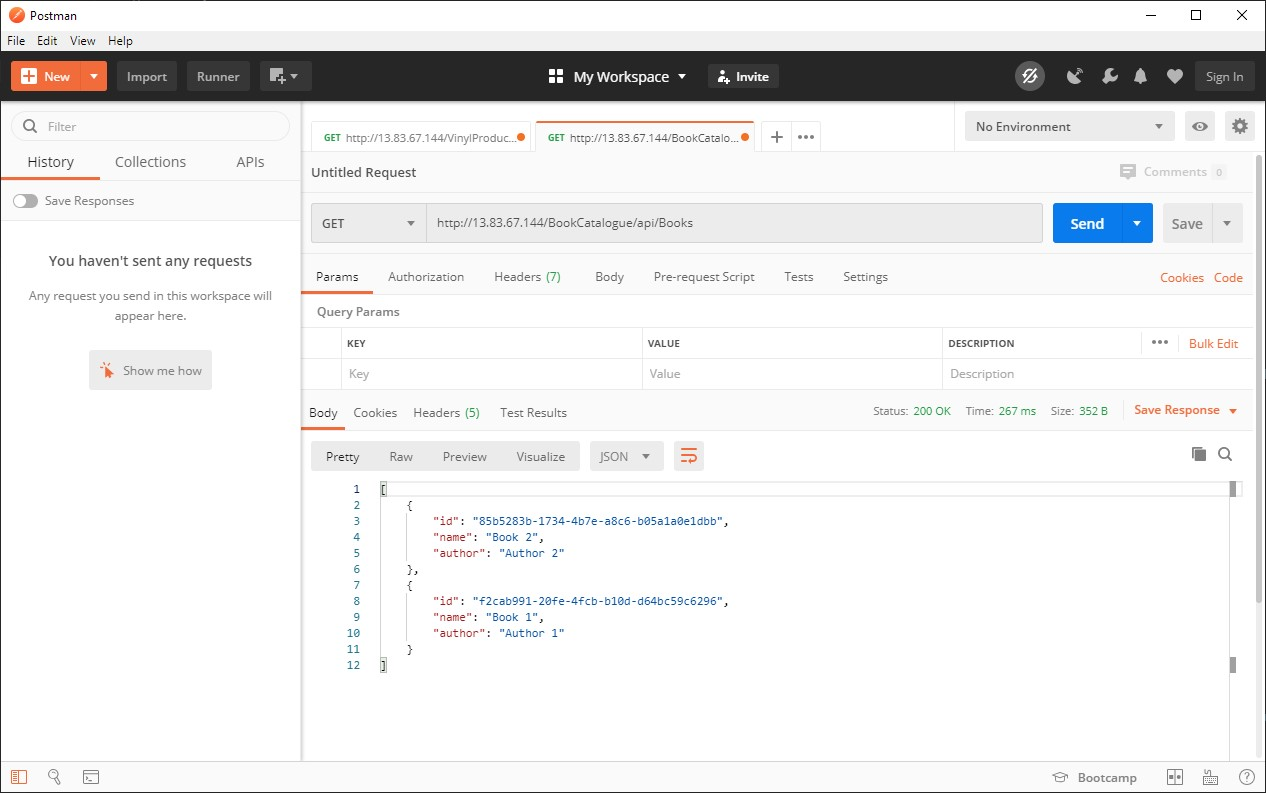
- http://IP Address/BookCatalogue/api/Books
The first endpoint should return a list of Vinyl Albums served by the Vinyl Microservice and the second endpoint will return a list of Books served by the Books Microservice.
What did we just do?
We installed Istio on an AKS cluster, deployed two microservices and then an Istio gateway. We configured the gateway to use path-based routing and route traffic to the microservices based on the HTTP URL. We verified that all is good, by hitting the two microservices using Postman.
References
| [1] | “Ngnix Blog,” Ngnix, [Online]. Available. [Accessed 2020] |