Git-based CMS for Jekyll using GitHub Actions – Part 3
In the previous post, we manually deployed our website to Azure and we enabled CDN with a custom domain and HTTPS. In this part, we will be automating deployments and we will create staging websites.
We will add a GitHub action that will deploy the production website when changes are pushed to the master/main branch. We will also add one GitHub action that will deploy a staging website when a pull request to master is opened. We will add one last GitHub action that will automatically tear down the staging website when the pull request is either merged or closed. These actions will allow us to leverage git branches to work on multiple posts or website changes without one affecting the other.
The publishing workflow will be:
- Create a new branch for every post or change, commit changes, and push the changes to GitHub
- Open a pull request to the master branch and wait for the bot to comment the URL of the staging website. If you are working in a team, you can share the URL of the PR for review
- If you are happy with the way your changes turned out, then merge the pull request. The production website will be updated, and the staging site will be torn down
- If you aren’t happy with the way your changes turned out, make some modifications, and push them to the branch. The GitHub action will update the staging site. If you are happy with the changes, merge the pull request and the production website will be updated and the staging site will be torn down
This approach is similar to deploying a website to a deployment slot, testing it out, and then swapping out the slot with production when everything is good.
Part 1 – GitHub action to deploy the master branch
In this section, we will build a continuous delivery pipeline that will build and deploy the website to Azure. The pipeline will:
- Install dependencies
- Build the production version of the website
- Upload the artifact – This might come in handy if we want to manually deploy a specific version of the website
- Login to Azure
- Sync the build directory with the storage account
- Purge the CDN cache
Step 1 – Prerequisites
Create a free GitHub account here.
Fetch the connection string for the storage account you created and keep it handy. If you don’t remember how to get the connection string for your storage account, you can find the instructions in part 2 of this series.
Step 2 – Push your repository to GitHub
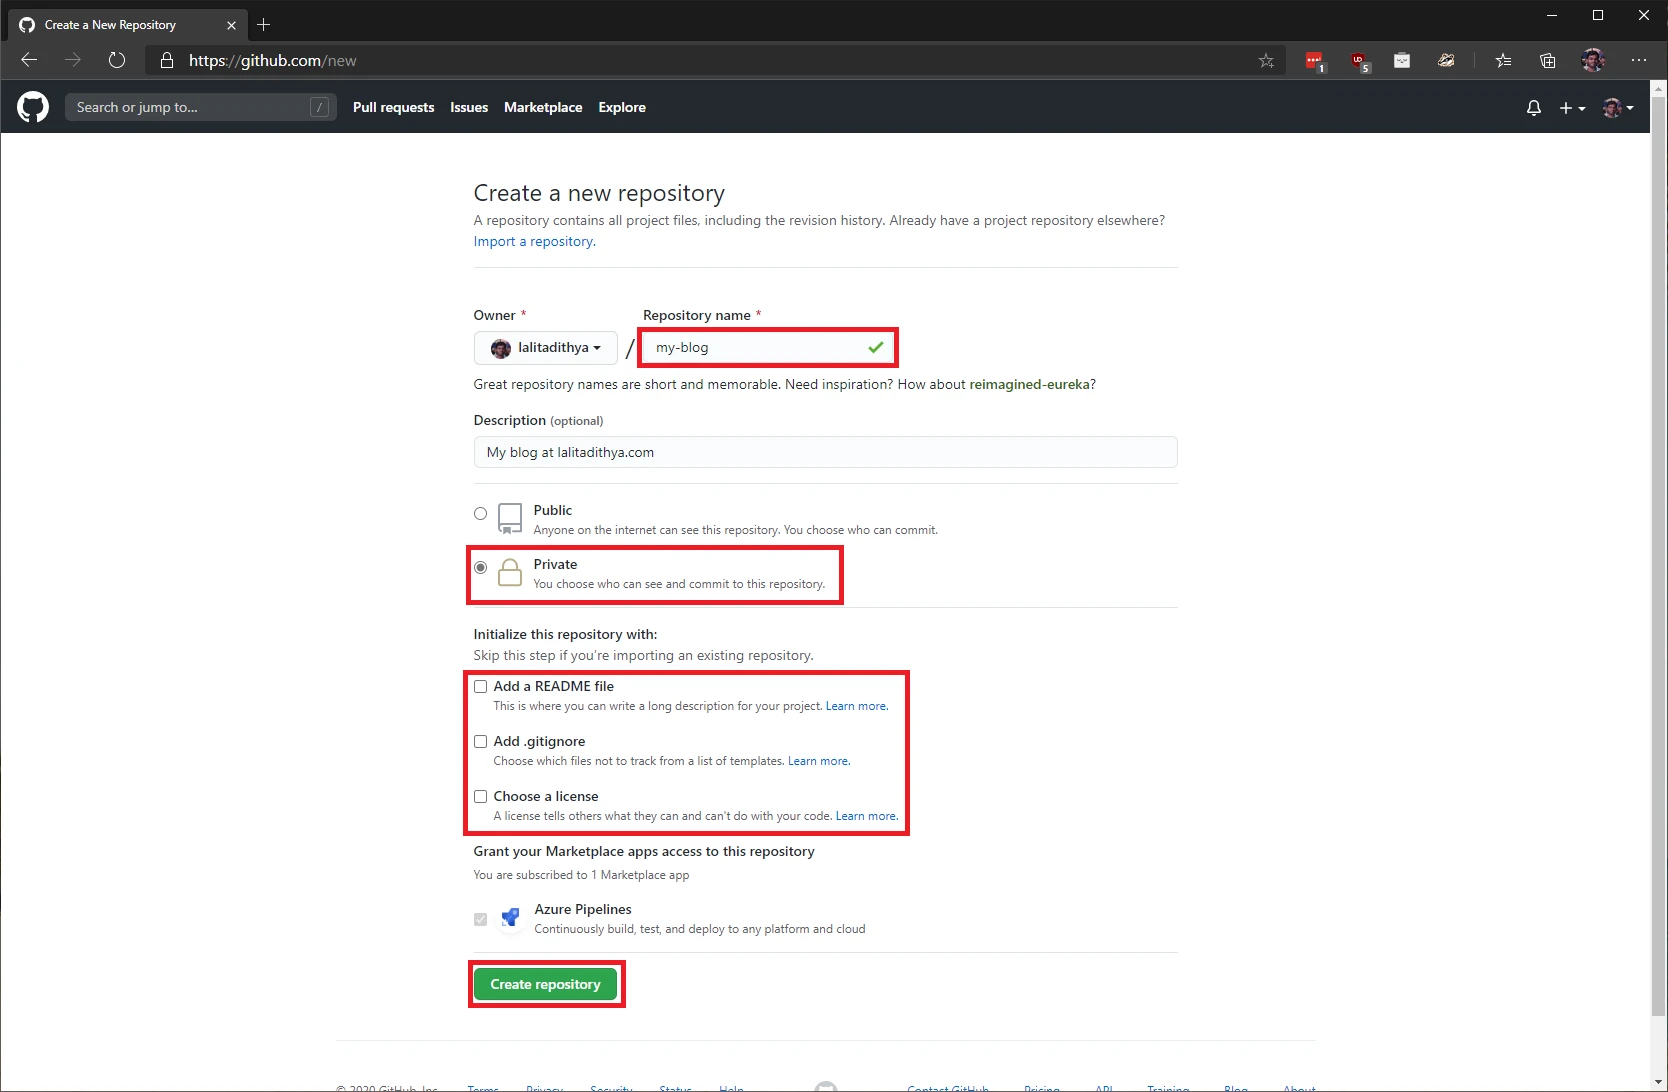
Navigate to this link in your browser to create a new repository. Select the “Private” option and be sure to uncheck all the options under “Initialize this repository with” heading. Give it a name and click on “Create repository” when you are done.
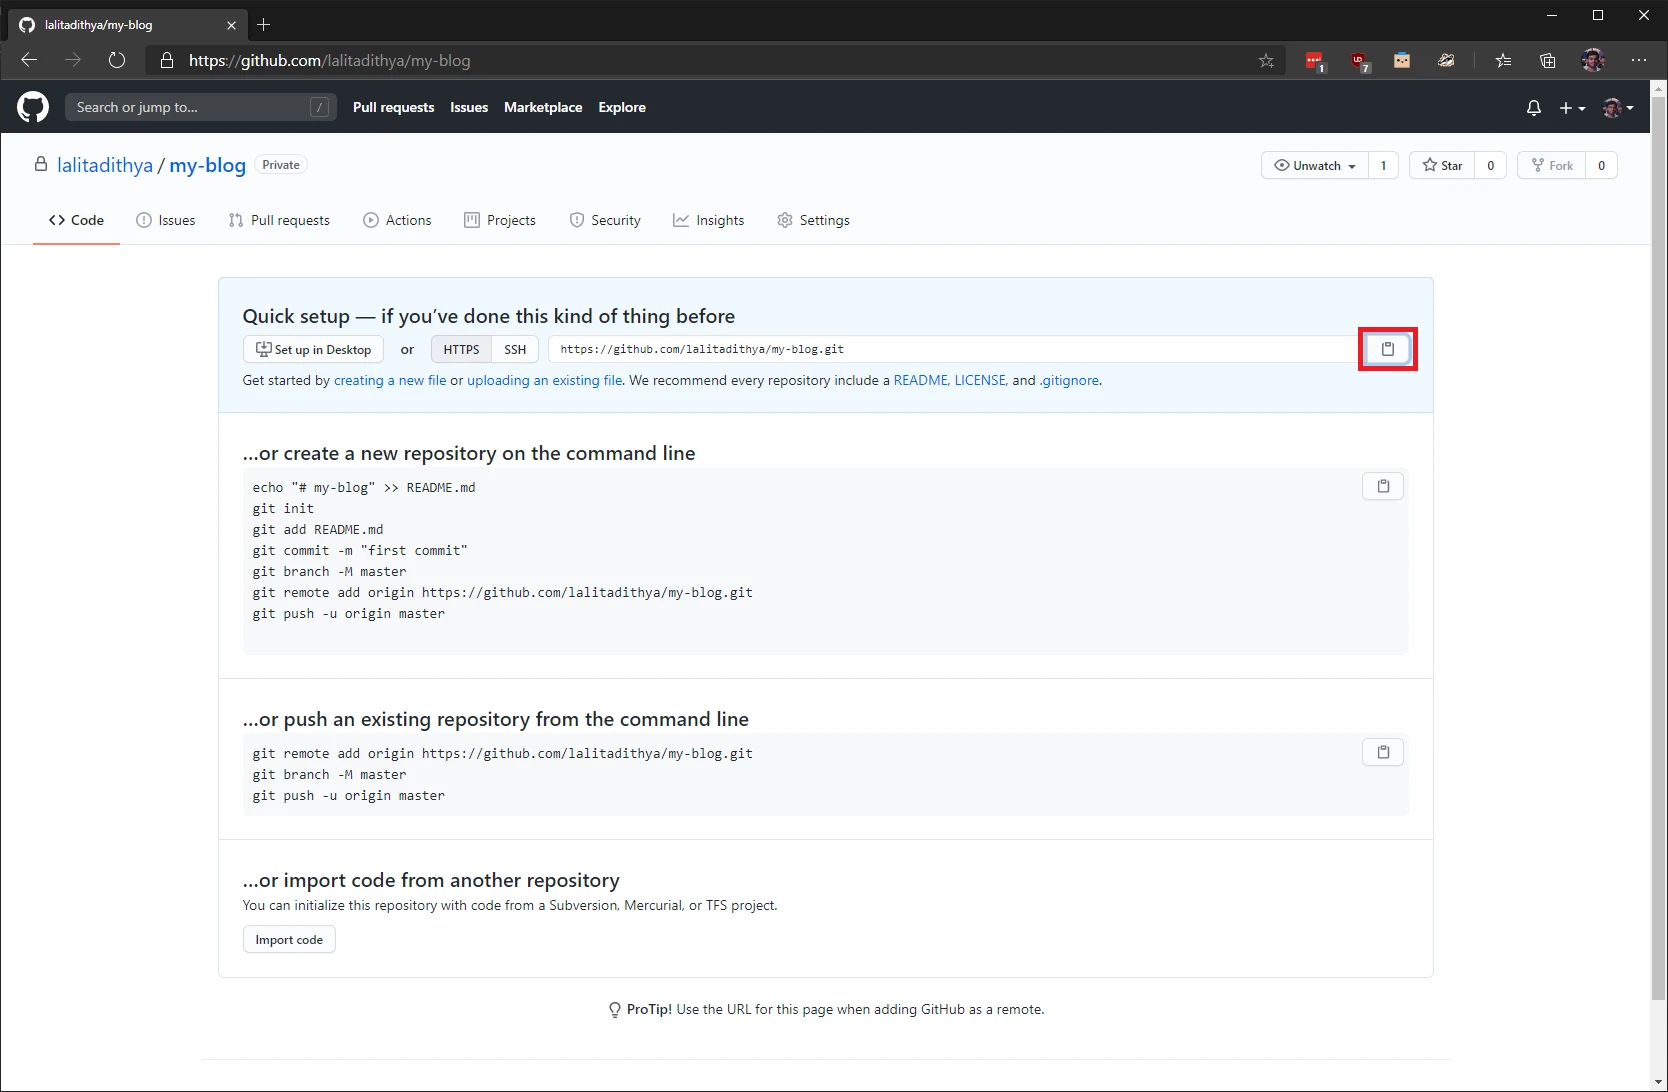
It should take a few seconds and when it is complete, you should see something like this. Copy the URL to your repository.
Open Visual Studio Code and click on the “Source control” link in the left pane. Click on the three dots on the top, select “Remote” and then select “Add Remote”
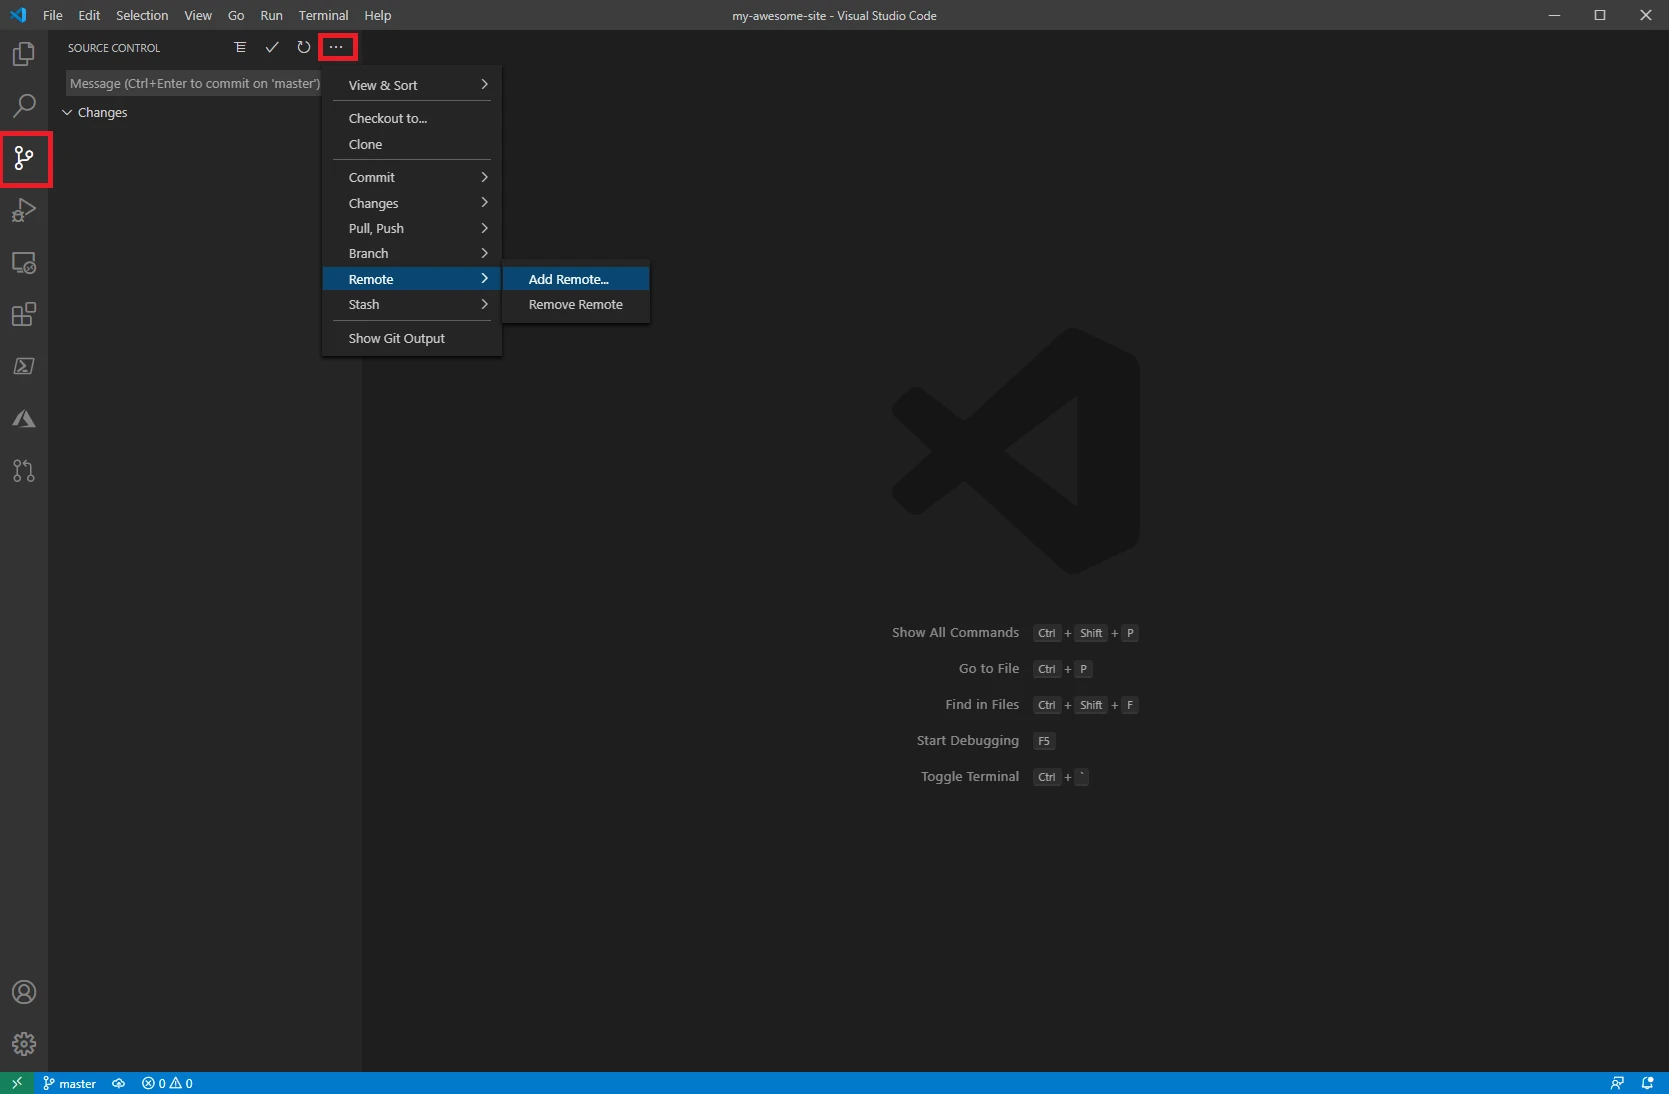
In the box that appears, paste the URL you copied and hit enter. When it asks you for a remote name enter “origin” and hit enter one more time.
Push your changes to GitHub by clicking on the three dots and then selecting “Pull, Push” and then selecting “Sync”. The sync option will ensure that it first fetches any changes in the remote, merges them with local, and then pushes the result to the remote. This operation might take a minute or two depending on your connection speed and the amount of data that needs to be synced.
Navigate to your browser and you should be able to view your code on GitHub. Since you created a private repository, only you will be able to view it and it can’t be indexed by search engines.
Step 3 – Add secrets
The action needs to talk to the storage account so that it can deploy your website and it needs to talk to your Azure account to purge the CDN cache. To establish this communication, the pipeline will need the connection string for the storage account and a service principle. Both items are like your password and you should not share it with anyone. To keep these items safe we will use GitHub secrets.
To add a GitHub secret, navigate to your GitHub repository in your browser, click on the “Settings” tab in the top navigation bar. Select “Secrets” in the left navigation bar that appears and then click on “New Secret”.
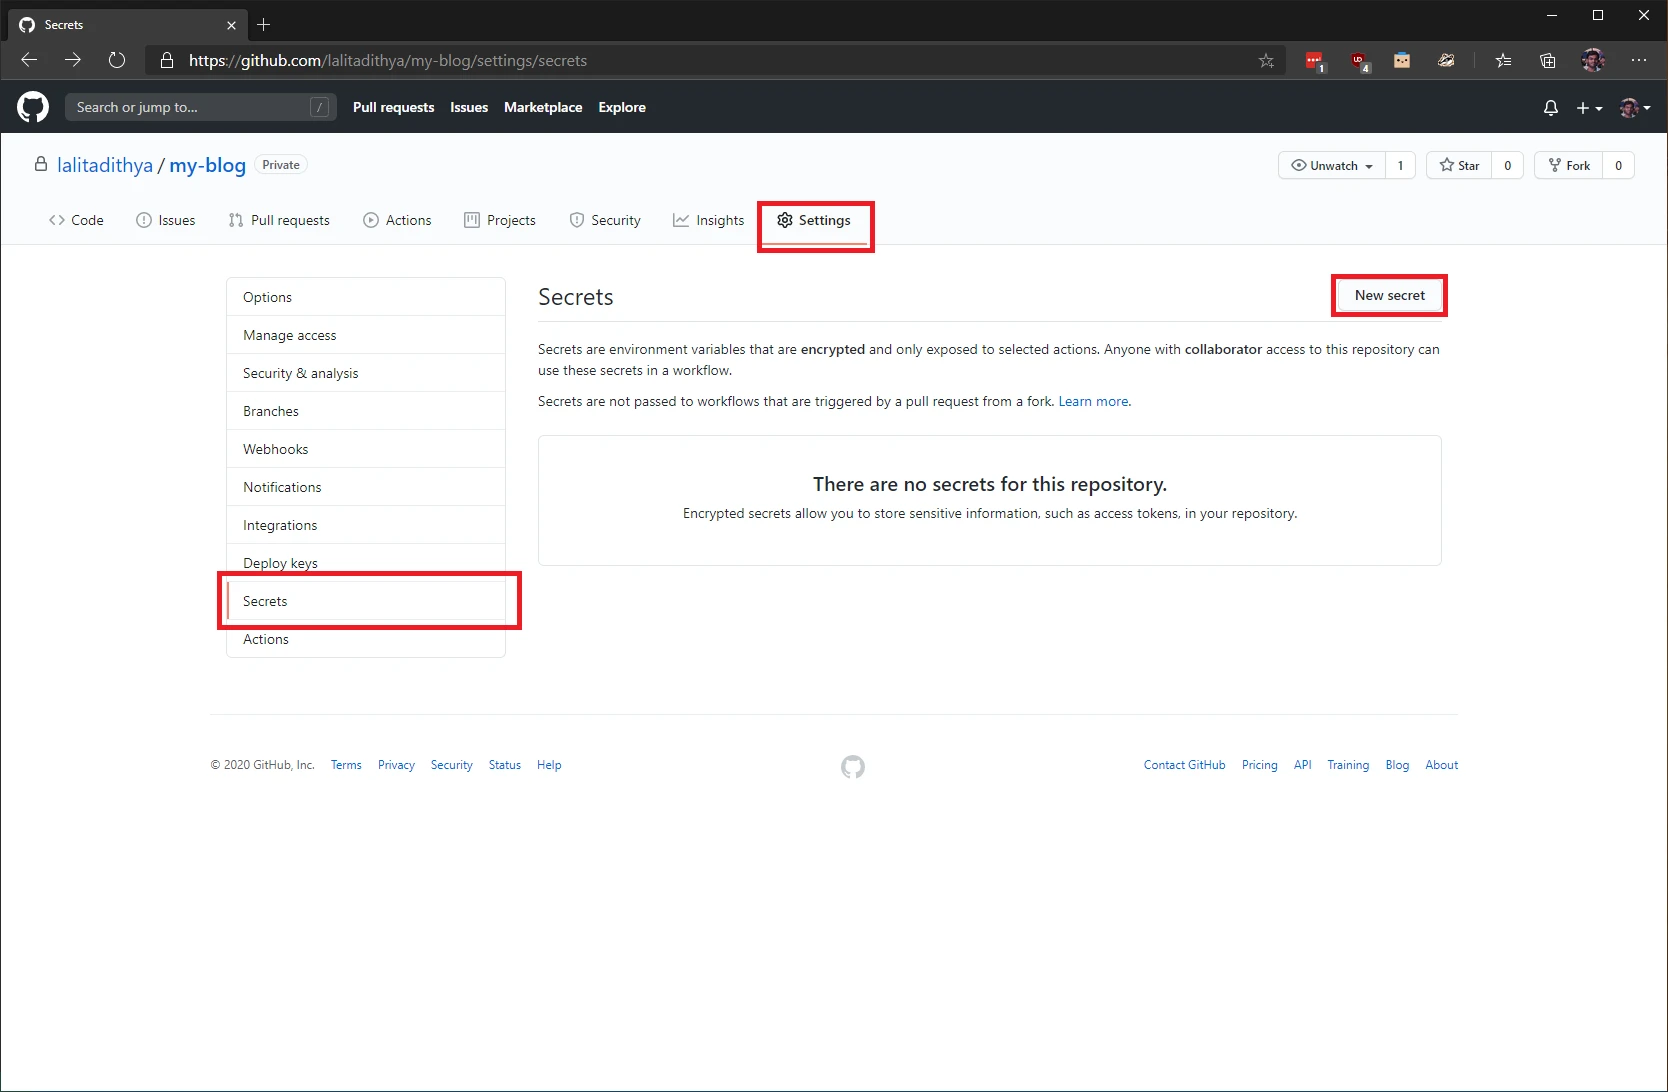
In the page that appears, you need to enter a name for your secret and the secret itself in the “value” text field and then click on “Add secret”.
Add the first secret with name “PROD_BLOB_CONNECTION_STRING” and the value will be the connection string for your storage account.
Let us create a service principle with contributor access to the resource group that contains our storage account. Start by finding your subscription id by running “az account list”.
> az account list
[
  {
    "cloudName": "AzureCloud",
    "homeTenantId": "...",
    "id": "...",
    "isDefault": true,
    "managedByTenants": [...],
    "name": "...",
    "state": "...",
    "tenantId": "...",
    "user": {
      "name": "...",
      "type": "..."
    }
  }
]
The command will output a JSON string that contains the details of your account. Your subscription id will be the value in the “id” field (bolded above).
Create a service principle by entering “az ad sp create-for-rbac –name “sp-blog-deploy” –role contributor –scopes subscriptions/<<subscription-id>>/resourceGroups/<<resource-group-name>> –sdk-auth” (replace the <<subscription-id>> with the id you copied in the previous step; replace <<resource-group-name>> with the name of your resource group) in your terminal.
> az ad sp create-for-rbac --name "sp-blog-deploy" --role contributor --scopes subscriptions/subscription-id/resourceGroups/resource-group-name --sdk-auth

Changing "sp-blog-deploy" to a valid URI of "http://sp-blog-deploy", which is the required format used for service principal names
Creating a role assignment under the scope of "/subscriptions/.../resourceGroups/rg-lalit_blog-prod-001"
{
"clientId": "...",
"clientSecret": "...",
"subscriptionId": "...",
"tenantId": "...",
"activeDirectoryEndpointUrl": "...",
"resourceManagerEndpointUrl": "...",
"activeDirectoryGraphResourceId": "...",
"sqlManagementEndpointUrl": "...",
"galleryEndpointUrl": "...",
"managementEndpointUrl": "..."
}
Add one more secret with name “AZURE_CREDENTIALS”. The value will be the JSON that is output by the command.
Step 4 – Add the GitHub action for continuous delivery
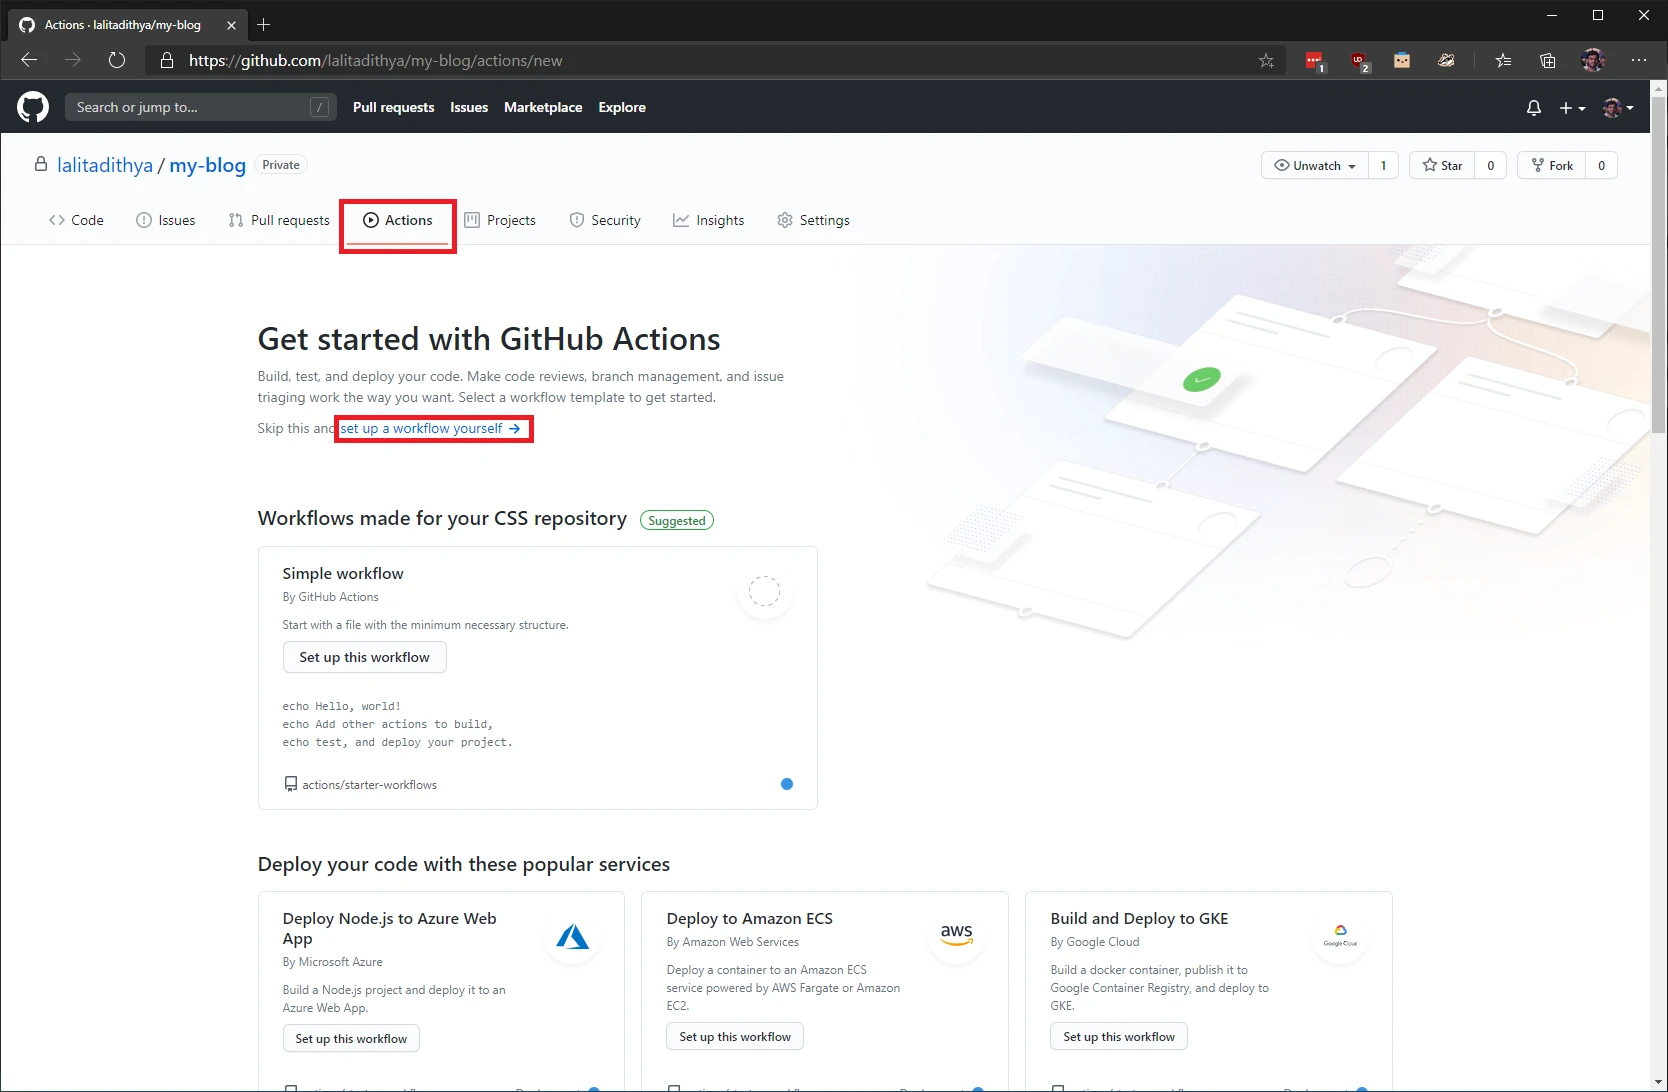
Navigate to your GitHub repository and create an empty action by clicking on the “Actions” tab and then clicking on the “set up a workflow yourself” link.
In the editor that appears, paste the below YAML definition for the GitHub workflow. Replace the placeholders represented by <<>> with the appropriate values and when you are done commit the file to the master branch
name: Build & Deploy Master

on:
  push:
    branches: [ master ]

jobs:
  build:
    runs-on: ubuntu-latest
    steps:
      - name: Checkout
        uses: actions/checkout@v2

      - name: Set up cache
        uses: actions/cache@v2
        with:
          path: vendor/bundle
          key: ${{ runner.os }}-gems-${{ hashFiles('**/Gemfile.lock') }}
          restore-keys: |
            ${{ runner.os }}-gems-

      - name: Set up Ruby
        uses: ruby/setup-ruby@v1
        with:
          ruby-version: 2.6

      - name: Install dependencies
        run: |
          bundle config path vendor/bundle
          bundle install --jobs 4 --retry 3

      - name: Build
        run: JEKYLL_ENV=production bundle exec jekyll build

      - name: Upload site
        uses: actions/upload-artifact@v2.1.4
        with:
          name: site
          path: _site/*
          if-no-files-found: error

  deploy:
    runs-on: ubuntu-latest
    needs: [build]
    steps:
      - name: Download site
        uses: actions/download-artifact@v2.0.5
        with:
          name: site
          path: _site

      - name: Azure Login
        uses: Azure/login@v1.1
        with:
          creds: ${{ secrets.AZURE_CREDENTIALS }}

      - name: Azure CLI Action
        uses: Azure/cli@v1.0.0
        with:
          inlineScript: |
            az storage blob sync -c '$web' -s '_site' --connection-string '${{ secrets.PROD_BLOB_CONNECTION_STRING }}'
            az cdn endpoint purge -g <<resource-group-name>> -n <<cdn-endpoint-name>> --profile-name <<cdn-profile-name>> --content-paths '/*' --no-wait
Once you commit the file, it should kick off the build and deploy process. It might take approximately 5 minutes to complete (subsequent runs will be significantly faster). While that is happening let us understand what the action is doing. The GitHub action runs on every push to the master branch and it has two jobs:
- Build – This job will build the production version of our website and it will upload the website as an artifact. The steps in this job are:
- Checkout – This step will checkout the code from the main branch
- Set up cache – This step sets up a cache for the build dependencies. The “Install dependencies” step is a time-consuming process, so we cache the output of the step to ensure that subsequent runs are faster
- Set up Ruby – This step sets up ruby version 2.6
- Install dependencies – This step installs the dependencies (including Jekyll) that are needed to build the website. Any plugins that you have enabled will be installed during this stage
- Build – This step will build a release/production version of our website using Jekyll
- Upload site – This step will upload the site as an artifact
- Deploy – This job will launch only after the previous job has completed and it will deploy our website and purge the CDN cache to ensure users get the latest version of the website. The steps in this job are:
- Download site – This step downloads the site that was uploaded by the previous job
- Azure Login – This step logins to Azure using the service principle provided
- Azure CLI Action – This step deploys our website and purges the CDN cache using the cli
Once the pipeline is complete, go to your website and ensure that a bad build hasn’t been deployed. Go ahead, make a change to your website, and push the change to master. The pipeline should kick-off and you should see your updated website live in a couple of minutes.
Part 2 – GitHub actions to deploy a staging website branch
In this part we will create two GitHub actions:
- GitHub action to deploy a staging website – This action will be triggered when a pull request is opened, reopened, or updated. It will build the website but unlike the previous action, it will also include draft and future posts in the website. Once the build is complete, it will deploy the website
- GitHub action to tear down the staging website – This action will be triggered when a pull request is closed. It will delete all the files from the storage account rendering the staging website inaccessible
Step 1 – Prerequisites
Create a new storage account and enable the static website feature as demonstrated in part 2. This storage account will be used for the staging websites. You don’t have to enable the CDN or a custom domain for the staging website (you can if you want to). The GitHub action will create a new folder/directory for every pull request and then deploy the website for that pull request in that folder. The name of the folder will be the pull request number. This will allow us to have multiple versions of the website in staging. This means that we don’t have to create a separate storage account for each pull request and delete them after the pull request is closed or merged.
Once the storage account has been created, create a new GitHub secret with name “STAGE_BLOB_CONNECTION_STRING” and the value as the connection string for the staging storage account.
Step 2 – Add GitHub Actions to deploy the staging website
Create a new blank GitHub action as you did earlier and paste the following YAML in the editor. Replace the items in «» with the appropriate values.
name: Build & Deploy staging website

on:
  pull_request:
    branches: [ master ]

env:
  stage_directory: ${{ github.event.number }}
  base_url: <<primary-endpoint-url>>

jobs:
  build:
    runs-on: ubuntu-latest
    steps:
      - name: Checkout
        uses: actions/checkout@v2

      - name: Set up cache
        uses: actions/cache@v2
        with:
          path: vendor/bundle
          key: ${{ runner.os }}-gems-${{ hashFiles('**/Gemfile.lock') }}
          restore-keys: |
            ${{ runner.os }}-gems-

      - name: Set up Ruby
        uses: ruby/setup-ruby@v1
        with:
          ruby-version: 2.6

      - name: Install dependencies
        run: |
          bundle config path vendor/bundle
          bundle install --jobs 4 --retry 3

      - name: Build
        run: JEKYLL_ENV=production bundle exec jekyll build --baseurl '${{ env.stage_directory }}' --future --drafts

      - name: Upload site
        uses: actions/upload-artifact@v2.1.4
        with:
          name: site
          path: _site/*
          if-no-files-found: error

  deploy:
    runs-on: ubuntu-latest
    needs: [build]
    steps:
      - name: Download site
        uses: actions/download-artifact@v2.0.5
        with:
          name: site
          path: _site

      - name: Azure Login
        uses: Azure/login@v1.1
        with:
          creds: ${{ secrets.AZURE_CREDENTIALS }}

      - name: Azure CLI Action
        uses: Azure/cli@v1.0.0
        with:
          inlineScript: |
            az storage blob sync -c '$web/${{ env.stage_directory }}' -s '_site' --connection-string '${{ secrets.STAGE_BLOB_CONNECTION_STRING }}'

      - name: Comment with URL for the staging website
        uses: mshick/add-pr-comment@v1
        with:
          message: Website has been deployed to ${{ env.base_url }}/${{ env.stage_directory }}
          repo-token: ${{ secrets.GITHUB_TOKEN }}
This GitHub action is extremely similar to the one we used for deploying the production version of the website, but it has a few key differences:
- It declares an environment variable called “stage_directory” and it holds the pull request number
- The Jekyll build makes use of the base URL command line flag to set the base URL for the entire website. It makes use of the “stage_directory” environment variable to determine the base URL. This is necessary because each pull request will deploy the staging copy of the website to a separate folder, i.e., if you have a pull request with numbers 1 and 2, then the action for pull request 1 will create a folder called ‘1’ in the root of the storage account and it will deploy its version to that folder. The action for pull request 2 will create a folder called ‘2’ and it will deploy its version to that folder. Since each folder has a website, we make use of the base URL to distinguish the websites. If the domain for staging is “stage.lalitadithya.com” then to view the changes made in pull request 1 we will have to navigate to “stage.lalitadithya.com/1” and to view the changes made in pull request 2, we have to navigate to “stage.lalitadithya.com/2”
- The Jekyll build makes use of the “future” and the “drafts” flag to include all posts with a future publish date and posts marked as a draft in the website that will be published
- The sync command deploys the website to the directory based on the pull request number and not the root directory
- The last step adds a comment with the URL for the staging website for easy access
Commit this action to the master branch, and add one more GitHub action with the YAML below:
name: Clean up stage website

on:
  pull_request:
    branches: [ master ]
    types: [ closed ]

env:
  stage_directory: ${{ github.event.number }}

jobs:
  clean-up:
    runs-on: ubuntu-latest
    steps:
      - name: Azure Login
        uses: Azure/login@v1.1
        with:
          creds: ${{ secrets.AZURE_CREDENTIALS }}

      - name: Azure CLI Action
        uses: Azure/cli@v1.0.0
        with:
          inlineScript: |
            az extension add --name storage-preview
            az storage blob directory delete -c '$web' -d '${{ env.stage_directory }}' --connection-string '${{ secrets.STAGE_BLOB_CONNECTION_STRING }}' --recursive
This action will make use of the storage preview extension of the az CLI to recursively delete the folder created by the previous action.
Go ahead create a branch, make some changes, and open a pull request. Give it a few minutes and then you should see a comment with a URL. Navigate to the URL and you should be able to see the changes deployed to a staging website. Merge the pull request to see your production copy of the website updated and the stage website deleted.
Conclusion
In this multi-series post, we saw how we can effectively make use of GitHub actions to develop a git-based CMS system for a Jekyll website.